Programming custom sasa daemons (advanced users)
The sasa Documentation already briefly explains how to:
- run simulations using the Built-in Daemons
- run simulations by playing the role of the Daemon “manually”
- run simulations using a Lutin program
This tutorial is a little bit more detailed. In particular, it explains show how to write daemon programs, that are for instance written in Lutin.
Download and Compile an Example
Let’s first download a sasa self-stabilizing algorithm (if you haven’t
already done this clone) that solves graph coloring problems:
[ -d "sasa" ] || git clone https://gricad-gitlab.univ-grenoble-alpes.fr/verimag/synchrone/sasa.git
cd sasa/test/coloring
First, we need to compile the Ocaml program that implements the
coloring algorithm. We also need to generate some registration code,
as explained in the sasa API Documentation (Section “code
registration”). The Makefile in the test directory automates this
task, in such a way that you just need to type:
make ring.cmxs
which produces the following output:
|
|
This make rule invokes sasa with the -reg option (line 1) to
generate registration files: the file ring.ml (line 2) is generated,
but not state.ml (line 3) as it is already present in the current
directory. Then (line 4), make invokes the ocaml compiler to
generate the ring.cmxs file.
Run a Simulation with a User-Controlled Daemon
Once ring.cmxs is generated, we can launch the simulation. If we
want to play manually the role of the daemon, we need to invoke sasa
with the --custom-daemon option:
sasa ring.dot --custom-daemon
|
|
By default, sasa prints on stdout data that follows the
RIF convention1. Line 1 declares the sasa
simulation inputs names and types, and line 2 declares the
outputs. Here, we have 14 outputs: 2 outputs per process (there are 7
nodes in the ring.dot graph). Output named <process_name>_c hold
values of the processes states; output named
Enab_<process_name>_conflict hold Booleans that state that the
corresponding process guard (named “conflict” in p.ml) is enabled.
This simulation has 7 Boolean inputs: <process_name>_conflict that
states which processes should be triggered. Of course, only enabled
process guards should be triggered.
In RIF, each is separated by a #step pragma (line 7).
The program output values are preceeded by the #outs pragmas (line
8): here, we can see that for the first step, 5 processes are enabled:
p1, p4, p5, p6, and p7.
If we want to trigger p1 and p6, we can enter the following input
values: t f f f f t f
|
|
With such an input vector, we can see that for the second step, only p4 and p5 are enabled.
Ditto, via Graphical Widgets (luciole-rif)
If you want to enter inputs (and visualize outputs) via a
graphical widget, you just need to invoke sasa via luciole-rif:
luciole-rif sasa ring.dot --custom-daemon
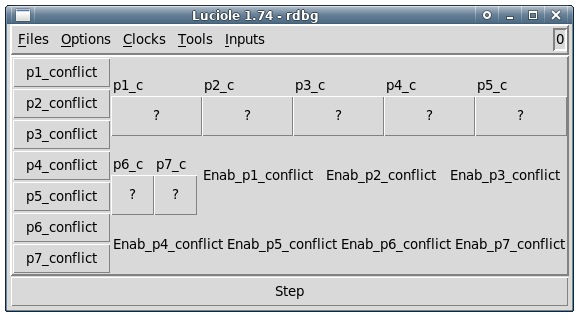
Figure 1: A Luciole Screenshot
For technical reasons (that should be turned around at some point), you can’t see which processes are enabled (you see only question marks), so you can’t really chose a process to trigger that is enabled. So, just click once on the step button to turn around this (minor) issue; the first Luciole output vector will be ignored anyway.
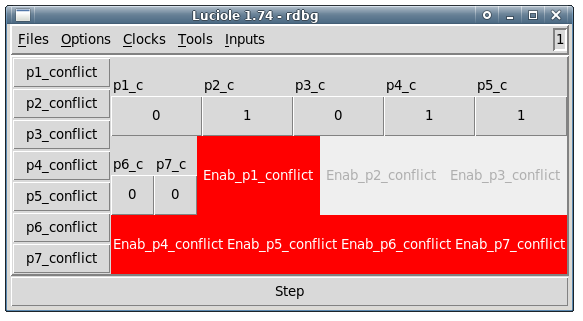
Figure 2: A Luciole Screenshot after a first (fake) step
Now you should see which processes are enabled. So you can chose one
process to trigger by clicking on one of the pi_conflict button. If
you want to trigger more than one process at the same step, you need
to select the Compose mode of Luciole accessible from the _Clocks
menu.
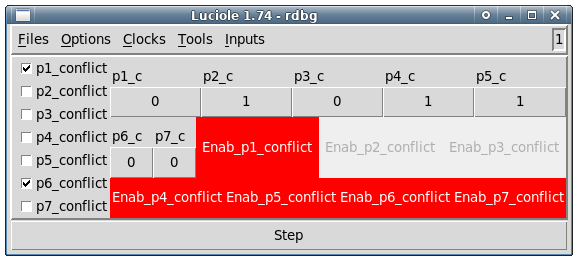
Figure 3: A Luciole Screenshot once the Compose mode has been set
Now you should be able to select several process actions
and then click on the Step button.
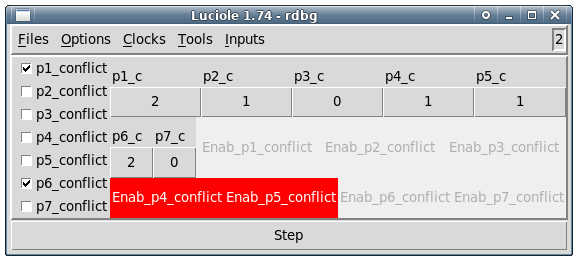
Figure 4: A Luciole Screenshot after a first (real!) step where p1 and p2 were triggered
You can visualize the input/output history of your simulations
with the sim2chro chronograms viewer, that can be launched from the
_Tools Button of Luciole, or (post-mortem) via the following
command
sim2chrogtk -screenrealheight 2000 -ecran -in sasa.rif > /dev/null
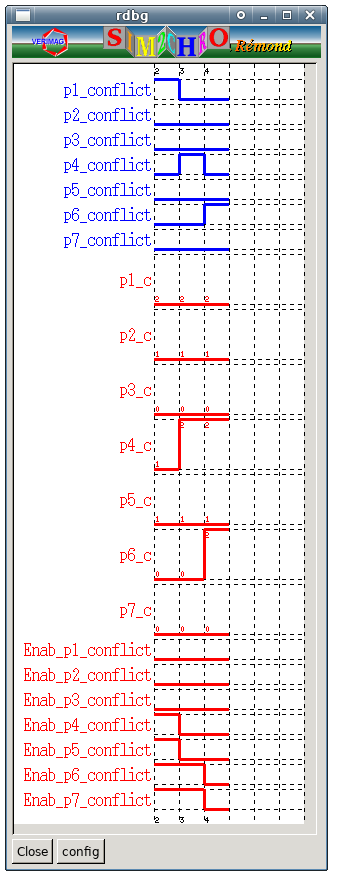
Figure 5: A Sim2chro Screenshot after a few steps
Programming the Daemon in Lutin
Ok, now you are really tired of clicking on buttons, you may want to have a program doing this job for you, more or less randomly. The Lutin language has been designed for this purpose.
As the previous sections tried to daemonstrate, a sasa Daemon is a reactive
program that:
- inputs processes enabled status (
Enab_pi_conflict), and processes local states (pi_c), - outputs processes trigger values (
pi_conflict)
By using the --gen-lutin-daemon of sasa, you can generate Lutin
nodes skeletons, which is handy to avoid to write the input/output
declarations. Indeed this work is tedious as the variables names
depend both on the algorithm implementation (the ocaml file(s)) and
on the topology (the dot file).
sasa ring.dot --gen-lutin-daemon
This command generates a ring.lut file (if not already existing in
the current directory), that contains a distributed node. This Lutin
node implements the distributed daemon which behaves exactly as the
sasa built-in distributed daemon.
This node is a good start to write your own custom daemon in Lutin, as the node interface can be copy/pasted. For example, here is a Lutin daemon that generates the worst-case scenario for the Dijkstra algorithm on a ring of size 10:
node worst(Enab_p0_T, Enab_p1_T, Enab_p2_T, Enab_p3_T, Enab_p4_T,
           Enab_p5_T, Enab_p6_T, Enab_p7_T, Enab_p8_T, Enab_p9_T : bool)
returns(p0_T, p1_T, p2_T, p3_T, p4_T, p5_T, p6_T, p7_T, p8_T, p9_T : bool) =
   assert (xor (p0_T, p1_T, p2_T, p3_T, p4_T, p5_T, p6_T, p7_T, p8_T, p9_T)) in
   loop {
         |> Enab_p0_T and p0_T
         |> Enab_p1_T and p1_T
         |> Enab_p2_T and p2_T
         |> Enab_p3_T and p3_T
         |> Enab_p4_T and p4_T
         |> Enab_p5_T and p5_T
         |> Enab_p6_T and p6_T
         |> Enab_p7_T and p7_T
         |> Enab_p8_T and p8_T
         |> Enab_p9_T and p9_T
   }
This programs states that:
- only one node can be activated;
- the enable node with the lowest id is always chosen.
Programming the Daemon in other languages
If you want, you can also program your daemon in any language, as long as it reads/writes on stdin/stdout with the RIF conventions.
But this might be the subject of another vtt post.
Useful Links
- This is useful for example to visualize the data via chronograms using sim2chro or gnuplot-rif. [return]